When workloads increase, small equipment issues can quickly become operational downtime. Use this equipment maintenance checklist to review batteries, tires, controls, steering, attachments, wiring, hydraulics, and common wear items before busy season begins.
A weak battery, worn tire, loose connection, damaged hitch, or worn handlebar component may seem minor during a slower period. When the equipment is needed for a busy shift, however, that same issue can interrupt the job and take the unit out of service.
Routine inspections give your team time to identify wear, schedule service, and order needed parts before a small problem becomes a larger repair.
Important: This checklist applies as general guidance across the full line of DJ Products units. Components and maintenance requirements vary by product, model, and configuration, so not every check will apply to every unit. Always follow the owner’s manual for your specific equipment. Stop using a unit if you identify damage or a condition that could affect safe operation.
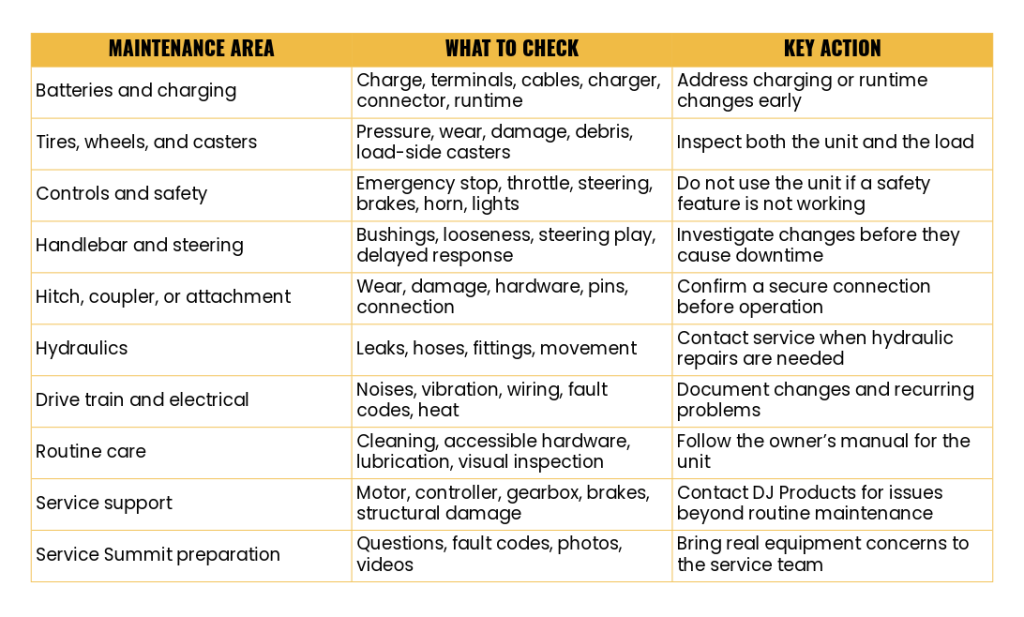
Quick Maintenance Summary
Small Part, Big Impact
The cost of a replacement part does not always reflect the amount of downtime it can cause.
In one case reported by the DJ Products service team, a customer’s unit was down for approximately one week because it needed handlebar bushings that cost less than $20 at the time.
The parts were inexpensive. The operational impact was not.
This is why unusual looseness, movement, wear, or changes in equipment performance should be addressed early. It may also be helpful to ask the DJ Products service team which commonly replaced parts are worth keeping available for your specific units.
1. Check the Batteries and Charging System
Battery condition directly affects equipment performance and runtime. Checking the batteries and charging system early can help prevent unexpected interruptions during a busy shift.
Inspect the following:
- Confirm that the batteries are fully charged.
- Check battery terminals for corrosion or buildup.
- Look for loose, damaged, or worn battery cables.
- Inspect the charger and charging connector for visible damage.
- Look for discoloration or signs of overheating.
- Pay attention to any noticeable decrease in battery runtime.
- Confirm that the charger is operating normally.
For units using lead-acid batteries, check the battery water level according to the battery manufacturer’s instructions and the owner’s manual.
A unit that is not holding a charge may have a battery problem, but the issue could also involve a damaged cable, loose connection, charger, or charging connector.
Document changes in runtime or charging behavior instead of waiting for the unit to stop operating completely.
2. Inspect Tires, Drive Wheels, and Casters
Tires and wheels affect traction, steering, control, and the amount of effort required to move a load.
Check for:
- Proper tire pressure, when applicable
- Cuts, cracks, flat spots, or visible damage
- Uneven or excessive wear
- Loose wheel hardware
- Debris around wheels or axles
- Worn drive wheels
- Casters that do not rotate or swivel freely
- Signs that the unit pulls to one side
Do not inspect only the DJ Products unit. The wheels and casters on the cart, trailer, vehicle, container, or other load should also be checked.
A damaged or poorly maintained caster can create additional resistance and make a properly operating unit appear underpowered.
Uneven or unusually fast tire wear may also indicate a steering, alignment, loading, or application issue that should be investigated.
3. Test the Controls and Safety Features
Before connecting the equipment to a load, test the controls and safety features in a clear, controlled area.
Check the following features when equipped:
- Emergency stop
- Other safety stop functions
- Throttle
- Forward and reverse controls
- Steering
- Braking response
- Horn
- Lights
- Remote-control functions
- Battery indicators
- Warning lights
The throttle should respond smoothly without sticking, hesitating, or causing jerky acceleration.
Steering should feel controlled and should not have excessive play or looseness.
Do not continue using the equipment if a safety feature is not working properly. A unit that does not respond safely and predictably should be removed from service until the issue has been addressed.
4. Check the Handlebar and Steering Components
Handlebar and steering components should feel secure and respond consistently.
For units equipped with a handlebar, inspect for:
- Excessive side-to-side movement
- Loose or worn handlebar bushings
- Movement between connected handlebar components
- Controls that shift or move unexpectedly
- Loose accessible hardware
- Difficulty controlling the unit
Also watch for:
- Excessive steering play
- Delayed steering response
- Difficulty turning
- Grinding or clicking while steering
- The unit pulling to one side
- Tires rubbing against nearby components
The handlebar bushing example from the DJ Products service team shows how a small wear item can create significant downtime when it is not identified or replaced early.
When the handlebar or steering begins to feel different from normal, document the change and have the unit inspected.
5. Inspect the Hitch, Coupler, or Attachment
The connection between the unit and the load is an important part of safe, controlled operation.
Inspect the hitch, coupler, or attachment for:
- Cracks, bends, or visible damage
- Excessive wear
- Loose or missing hardware
- Damaged pins or retaining components
- Latches that do not close or lock properly
- Excessive movement at the connection point
- Misalignment between the unit and the load
- Damage to custom attachment components
Make sure the connection is secure before beginning a move.
Capacity matters, but the connection method also affects how the operator controls the load while starting, stopping, and turning.
If an attachment appears damaged or no longer connects securely, stop using it until it has been inspected.
6. Look for Hydraulic Leaks
For units equipped with hydraulics, inspect the system for visible signs of leakage or damage.
Check for:
- Fluid under or around the unit
- Wet areas near hydraulic fittings
- Cracked, worn, or damaged hoses
- Loose fittings
- Slow or inconsistent hydraulic operation
- Unusual sounds during hydraulic movement
Hydraulic systems operate under pressure. Do not use your hands to search for a hydraulic leak, and do not attempt hydraulic repairs unless you are trained and authorized to complete them.
Contact DJ Products if a hydraulic component is leaking, damaged, or operating inconsistently.
7. Listen to the Gearbox, Brakes, and Drivetrain
Operators often notice the first warning signs through changes in the way the equipment sounds, feels, or responds.
Listen and watch for:
- Grinding
- Clicking
- Whining
- Squealing
- Excessive vibration
- Reduced pulling or pushing power
- Delayed movement
- Inconsistent speed
- Changes in braking performance
- Unexpected stopping
A new sound or vibration should be documented, even when the unit still appears to operate.
A short video can be especially helpful. Record the sound and show what the equipment is doing when the issue occurs. This gives the DJ Products service team more information to use during troubleshooting.
8. Inspect Wiring and Electrical Connections
Look over all accessible wiring and connectors for obvious signs of damage.
Check for:
- Loose electrical connections
- Rubbed-through insulation
- Pinched or damaged wires
- Corrosion
- Discolored connectors
- Exposed wiring
- Signs of overheating
- A burning smell
- Unusually hot electrical components
Stop using the unit if you notice a burning smell, damaged wiring, smoke, or excessive heat around an electrical component.
Only complete basic electrical maintenance that is specifically covered in the owner’s manual. Motor, controller, or recurring electrical problems should be handled by DJ Products or qualified service personnel.
9. Tighten Accessible Hardware and Remove Debris
Normal operation can cause accessible hardware to loosen over time. Dirt and debris can also build up around moving components and affect performance.
During the inspection:
- Check accessible bolts and hardware.
- Look for missing fasteners.
- Remove dirt and built-up debris.
- Clean around wheels and moving components.
- Inspect guards and covers.
- Make sure safety labels remain visible.
- Lubricate approved grease points according to the owner’s manual.
Only use the lubrication points and products specified for your equipment.
Do not remove safety guards or disassemble components unless the procedure is included in the manual and your team is qualified to complete it.
Warning Signs That Should Not Be Ignored
A change in equipment performance may be an early sign that maintenance or service is needed.
Watch for:
- Reduced pulling or pushing power
- Batteries that do not last as long as they previously did
- Grinding, clicking, or whining noises
- Jerky acceleration
- Inconsistent speed
- The unit pulling to one side
- Excessive vibration
- Hydraulic leaks
- Warning lights or fault codes
- A burning smell
- Unusually hot electrical components
- Uneven or unusually fast tire wear
- Recurring charging problems
- Controls that stick, hesitate, or respond unpredictably
- Excessive movement in the handlebar or steering components
- Loose or worn bushings
Continuing to use equipment with a recurring issue may allow a smaller problem to become a more complicated repair.
Stop and investigate any condition that affects safe, controlled, or predictable operation.
Maintenance Customers Can Typically Perform
Trained operators and maintenance personnel can complete many basic checks without disassembling the equipment.
Routine customer maintenance may include:
- Performing a visual inspection before use
- Checking the battery charge
- Cleaning battery terminals
- Checking tire pressure and condition
- Cleaning the equipment
- Removing built-up dirt and debris
- Inspecting accessible wiring and connectors
- Tightening accessible hardware
- Lubricating approved grease points
- Testing the horn, lights, and emergency stop
- Checking for visible leaks or damage
- Checking the handlebar and steering for unusual looseness
Always follow the instructions for the exact model being inspected.
Do not attempt a repair when the procedure, required tools, or safety steps are unclear.
When to Contact DJ Products
Some equipment problems require specialized diagnostic work, replacement components, or trained service personnel.
Contact DJ Products for assistance with:
- Electrical problems beyond routine maintenance covered in the owner’s manual
- Motor or controller problems
- Gearbox or differential repairs
- Hydraulic component repairs
- Brake repairs that require disassembly
- Persistent fault codes
- Recurring problems that return after routine maintenance
- Structural damage
- Damage that may affect safe operation
- Warranty-related concerns
- Any issue your team is unsure how to address
When contacting the service team, have the following information available when possible:
- Equipment model
- Serial number
- Fault code
- Description of the problem
- When the problem occurs
- Recent maintenance or repairs
- Photos or videos of the issue
Clear information can help the service team understand what is happening and determine the appropriate next step.
Suggested Equipment Maintenance Schedule
The following schedule is a general starting point based on guidance from the DJ Products service team. Always follow the owner’s manual when it includes more specific requirements.
Before Each Use
- Walk around the unit.
- Check the battery charge.
- Inspect tires and wheels.
- Test safety features.
- Check the throttle and controls.
- Check the handlebar and steering.
- Look for leaks.
- Look for visible damage.
- Listen for unusual sounds.
Weekly
- Clean the equipment.
- Remove built-up debris.
- Inspect battery terminals.
- Inspect accessible wiring.
- Check steering and handlebar components.
- Check the hitch, coupler, or attachment.
- Review concerns reported by operators.
Monthly
- Lubricate approved grease points.
- Inspect accessible drivetrain components.
- Check the charger and charging connector.
- Review tire wear.
- Check accessible hardware.
- Confirm that the equipment is operating normally.
Every 6 to 12 Months
- Complete a more thorough preventive maintenance inspection.
- Test battery performance.
- Inspect the gearbox and drivetrain.
- Review the condition of the brakes and hydraulic system, when equipped.
- Inspect common wear items.
- Replace worn components before they create larger problems.
Equipment that is used frequently, operates under demanding loads, or works in harsh conditions may require more frequent inspections.
Consider Which Spare Parts to Keep on Hand
The handlebar bushing example shows that downtime is not always caused by an expensive component or a major repair.
A low-cost wear item can still take a unit out of service when the correct replacement part is not available.
Because parts requirements vary across the DJ Products product line, customers should speak with the service team about which common parts may be appropriate to keep on hand for their specific equipment.
Having the right model-specific parts available can help reduce delays and prevent a minor maintenance need from interrupting operations for several days.
Prepare for Service Summit 2026
Preventive maintenance and troubleshooting will be important parts of the DJ Products Service Summit on September 16 and 17, 2026, at the DJ Products manufacturing facility in Little Falls, Minnesota.
Planned maintenance and troubleshooting topics include:
- Preventive maintenance practices that help reduce downtime
- Battery care and battery life
- Proper charging practices
- Diagnosing common electrical problems
- Motor and controller troubleshooting
- Drivetrain and gearbox inspections
- Brake maintenance
- Hydraulic maintenance
- Identifying small problems before they become larger repairs
- Recommended spare parts to keep on hand
- Live troubleshooting demonstrations
- Open Q&A with the DJ Products service team
Before the Summit, inspect the equipment your team uses most often. Write down recurring problems, unusual noises, fault codes, charging concerns, loose components, or changes in performance.
Registered attendees are also encouraged to bring photos or videos of equipment issues they have experienced.
It is often easier to understand a problem when the service team can see or hear what is happening. These real examples can also support more practical conversations during the live troubleshooting sessions.
Inspect Early and Keep Your Equipment Ready
Busy season is easier to manage when your equipment is prepared for the increased workload.
A consistent inspection routine can help your team identify wear, schedule service, order needed parts, and reduce preventable downtime.
Start with the basic checks in this guide, follow the maintenance instructions for your specific unit, and contact DJ Products when an issue requires additional support.
For Service Summit attendees, bring your equipment details, maintenance questions, fault codes, photos, and videos. The more information the service team has, the more productive the troubleshooting conversation can be.
DJ Products service technicians can also provide live video support to help diagnose equipment issues. A DJ Products technician can join a video call while your technician is on-site, view the unit and symptoms in real time, and help guide the troubleshooting process. Have the unit’s model, serial number, fault codes, and a description of the issue available before the call.
Some repairs may still require additional testing, replacement parts, or qualified service personnel. If the issue cannot be safely resolved remotely, the DJ Products service team can recommend the appropriate next steps.
Need help diagnosing an equipment issue? Contact the DJ Products service team to discuss available troubleshooting support.